


Swapping Circuit Boards of an Xbox 360 DVD Drive
Clicks: 23010
Author:
This tutorial explains how to swap circuitboards for a Philips LiteOn 16D2S DVD Drive, like the ones we sell on the shop and Ebay.
Tools required:
Soldering iron(preferably a strong one, 25W+ recommended)
Some Solder(sometimes)
Standard size Philips Screwdriver(case screws)
Small Philips Screw driver(For the small screws holding the PCB)
Tutorial:

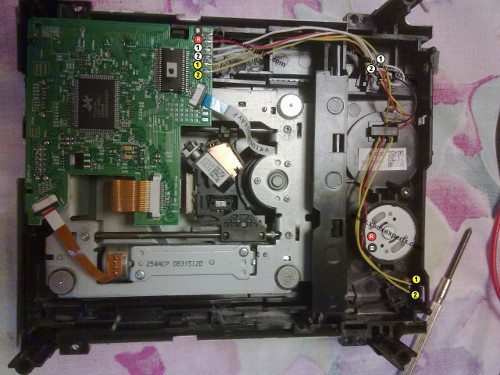
1) Open up the DVD-Drives, your original and the new drive, unscrew the 4 screws and take the metal chassis off, then turn on the back so you see this:
2) Desolder the 6 wires from the circuit board(like on the picture above, R, B , Yellow: 1 & 2 and White 1 & 2 Do that for both drives. So that it looks like this:
Tip: Label the cables before you desolder them, so you know where to solder them back on, but you can also use the graphic I made above.
3) Optional: If your DVD Drive also has 3 additional wires soldered to the drive for the Spindle motor, desolder these too, see right picture below, if yours is a flat cable(left picture) you dont have to do anything

4) Then unplug all the flat cables, the Laser, The 2 Motors(1 motor if you desoldered it, see 3))

5) Then unscrew the 2 black screws, most times it is only 1 screw, the new ones have only 1 screw, old drives usually have 2.
6) Then you take out both circuitboards and switch them, you put the circuitboard from the old drive into the new one, I suggest labeling them, so you dont accidentally mix them up and forget which one is the original one.
7) Now the fun of soldering the 6 wires back on starts.
Use the picture above, to solder the cables back on, make sure you solder every cable back to the correct point, otherwise your drive will act very funny if you solder a wrong cable to the wrong spot.

8) Optional: If your drive has a spindle motor without a flat cable you now need to solder it back on, first apply a little solder because these pads usually dont have any solder on them

Then solder the 3 wires to the points like pointed out on this picture(From left to right: Black, Red, White wires)

When youre done it should look like this
9) Now plug all the flat cables back in, it is 3 in total, or 2 if you had to do Step 8) (special spindle motor)
10) Then screw the 2 black screws back in, most times it is only 1 screw, the new ones have only 1 screw, old drives usually have 2.
Tighten the screws really tight, because otherwise the circuit board tends to get loose when you plug in the cables.
11) Put the metal chassis back on, thats it, youre done and now it should work in your xbox.
If it doesnt work, check your wiring, it must be the right order, this is the reason where the mistakes happen mostly, also make sure all the flat cables are in all the way on both ends, sometimes they get loose a bit, they may not be at an angle.
Here the picture again for reference:
Notice: The Tutorials have been done many times and were often successfull, however we cannot guarantee the success and so dont take any responsibility for any damages that might be caused by it, you do it on your own risk!!!