


Reading Out Games(XGD3) with a 0800 DVD-Drive
Preparations
Clicks: 32303
Author:
1) Preparations:
1.1) Attaching the Power Dongle to the DVD-Drive
The Power dongles very easily get loose by design, which is very fatal while using the drive, the adapter loosens a tiny bit, the drive looses power for a second and doesnt work anymore after that. You must restart your computer to get it to work again if that happens to get it to be recognised properly again.
Your DVD-Drive is NOT DEFECTIVE, this is the MOST IMPORTANT PART OF THE TUTORIAL, so take it very serious, it saves you a lot of time and hassle, its the NO 1 reason why drives do NOT SHOW UP or the OK button in IMGBurn does not become active.
What you need is doublesided tape or adhesive(very thin adhesive or tape, nothing with foam or so, that makes things thicker), we deliver our adapters with adhesive already which you can use or you can buy it at craft stores/home depot.


First cut out a little rectangle of the size 6x3cm. (2.36" x 1.18")

Afterwards you cut out a little corner of the size 2,25x0,75cm (0.88" x 0.3") like on the picture and round off the remaining corners a little bit.

The bit you cut out should look like this in the end.

Now you can take off the protective layer(make sure its the right side)

and attach it to the adapter, press it on well, then let the adhesive settle for 3 minutes.

Now you can also take off the remaining protective layer

and attach the adapter on the DVD-Drive, make sure that the connector is in as far as it goes and well connected, press it on hardly, so that everything sticks and nothing moves out anymore.
1) Is the ON-OFF Button, when the drive is on the LED lights up.
2) Is the Eject-Button, you open the drive with that(You must hold the button for it to open)
By the Way: The third button is MODE-B, this is not relevant for what we are doing here, the only purpose of that button is putting Hitachi drives in MODE-B for flashing.

Now we will test if the adapter has a good connection, attach the drive to the SATA cable(data) and the power cable. Then switch on the computer or if you are using an external power supply, plug the power supply in.(In the picture I am using an external power supply with a USB SATA Dongle)

Then switch on the drive using the ON-OFF switch on the adapter, the LED should light up blue(otherwise the adapter doesnt have any power), now hold the eject-button, the drive should make a clicking noise and then the tray should move out.
If the tray does not eject, proceed as follows:
1) If you press the Eject-Button you DO hear a Noise from the DVD Drive:
Press the Eject-Button a few times, hold it for 5 seconds, then release it for 5 seconds, hold it again, etc. Repeat for a couple of times, the tray should eject after a few tries, sometimes pulling the tray gently helps. This happens sometimes because the tray gets jammed a bit during transport occasionally after ejecting a few times its okay again.
2) If you press the Eject-Button you DO NOT hear ANY Noise from the DVD Drive:
First of all switch the Drive off and back on, the DVD-Drive must always be switched off and back on whenever it lost power, otherwise it will not eject or work at all in general.
In this case the adapter isnt all the way in yet, you must adjust it a little bit, press it in a bit more, be also a bit more careful when you press the eject button, when you press it the adapter may not move at all whatsoever, be very gentle, so that nothing moves and it should work in the end, it can be tricky.
That's it now the drive should eject and you can proceed.
1.2) Checking and Changing the SATA Bios Settings
This only is required if you directly connect the Drive to the PC by SATA so if you are NOT using a USB-SATA Dongle
In this case you have to go to your BIOS and change the SATA-Mode, how to go to the BIOS is different for every PC. When you switch it on you get a screen where you have to press a certain button to get into SETUP or whatever it is called for you, usually it is the DEL or F1, F2, F12 button, it should tell you on the screen.
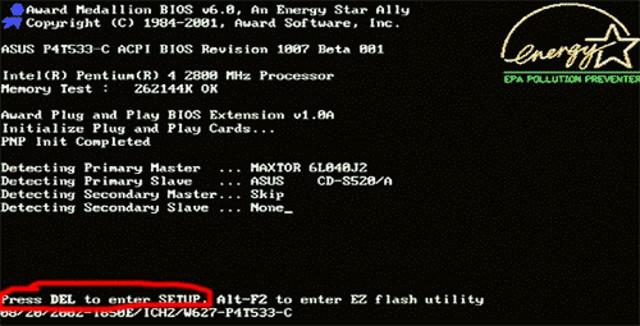
Here is an example screen, here it is the DEL button.

In the BIOS you must search the SATA Settings, somewhere it should say SATA-Mode or so, there switch it to AHCI, every BIOS is different so I cant help you with that, you must search it.
In case of doubt just try it without the setting, if the drive doesnt show up in Windows in the end you can try finding the setting again.
If you have problems all the time I recommend a USB SATA Adapter very important one WITH an external Power supply like Logilink for example, some others dont work with the drives!
They are really AWESOME! Using a normal PC drives you insane with these there are so many stupid settings and you need to restart the PC all the time. With the USB Adapters all you need to do is plug it out and back in if something messes up. So if you dont know what else to do try this, almost guaranteed to work, much less problems really...
Notice: The Tutorials have been done many times and were often successfull, however we cannot guarantee the success and so dont take any responsibility for any damages that might be caused by it, you do it on your own risk!!!